Boost Your Summer Beverages With These Frozen Flavor Pods

One of Summer’s best gifts is an ice cold lemonade! There is something so nostalgic and wonderful about sitting outside, on the porch, in the back yard or by the pool sipping on lemonade right? And while lemonade is good on it’s own, adding a little extra flavor just makes it that much better! My mom got me on to these little frozen gems and I love them so much, I make batches of 3 flavors at a time, just so I have options down the line.

For this post, I looked at what I happened to have on hand, but again, you can use anything! Some other options could include,

  • Orange juice with Strawberry slices added last

  • Raspberry, Blackberry and sprigs of Thyme added last

  • Watermelon & a slice of Jalapeño added last

  • Honeydew & Lime juice

  • Cherries and lemon zest added last

Now there are a couple of things I would like to suggest in regards to flavors and texture… Just think about the colors before you blend. Mixing blueberries and orange juice for example might not end up the prettiest of colors, unless you like the idea of your lemonade with a brownish tint. (I am sure it would still be tasty!) Another consideration is looks. If you are using something that is actually pretty, consider dicing or slicing it and adding it to your mix instead of blending.

Cucumber and Mint for this one!

Let’s go through the steps quickly so you can get going on making these today!

Step 1: Add your peeled fruit chopped up in a blender. Add a little juice or water if needed.

Step 2: Blend until the mixture is similar to a smoothie

Step 3: Pour into ice trays or mini muffin trays. Add a little sprig or slice on top so you know which ones are which.

Step 4: Freeze overnight

Step 5: Remove from freezer, let them sit out for a few minutes and then remove them from the container. Place them in a freezer bag or a freezer safe container and store for up to 2 weeks.

Step 6: The next time you pour a glass of lemonade, ice tea, soda water or even a cocktail, pop one of these little gems in to boost the flavor!

3F94B714-024C-4243-9E97-5AD5D92A1775.JPG

My Flavors Of The Week!

Ginger Peach, Cucumber Mint & Pineapple Mango

IMG_1169.jpg

Using your extra ripe fruit will make it extra sweet!

D1BBC96A-79AF-4E9E-BE90-C2442870A848 3.JPG

Peel, chop, blend & freeze…that’s it!

F9E672D2-6F9B-4A04-B010-A06EB0E4156C 2.JPG
IMG_1262.jpeg

Try Them In A Cocktail or a Mocktail!

Not much more to say other than TRY THEM! There are endless options on flavors, colors and what to add them to!

What’s Your Flavor???

How to Make a Haku Lei: A Step-by-Step Guide to This Beautiful Graduation Tradition

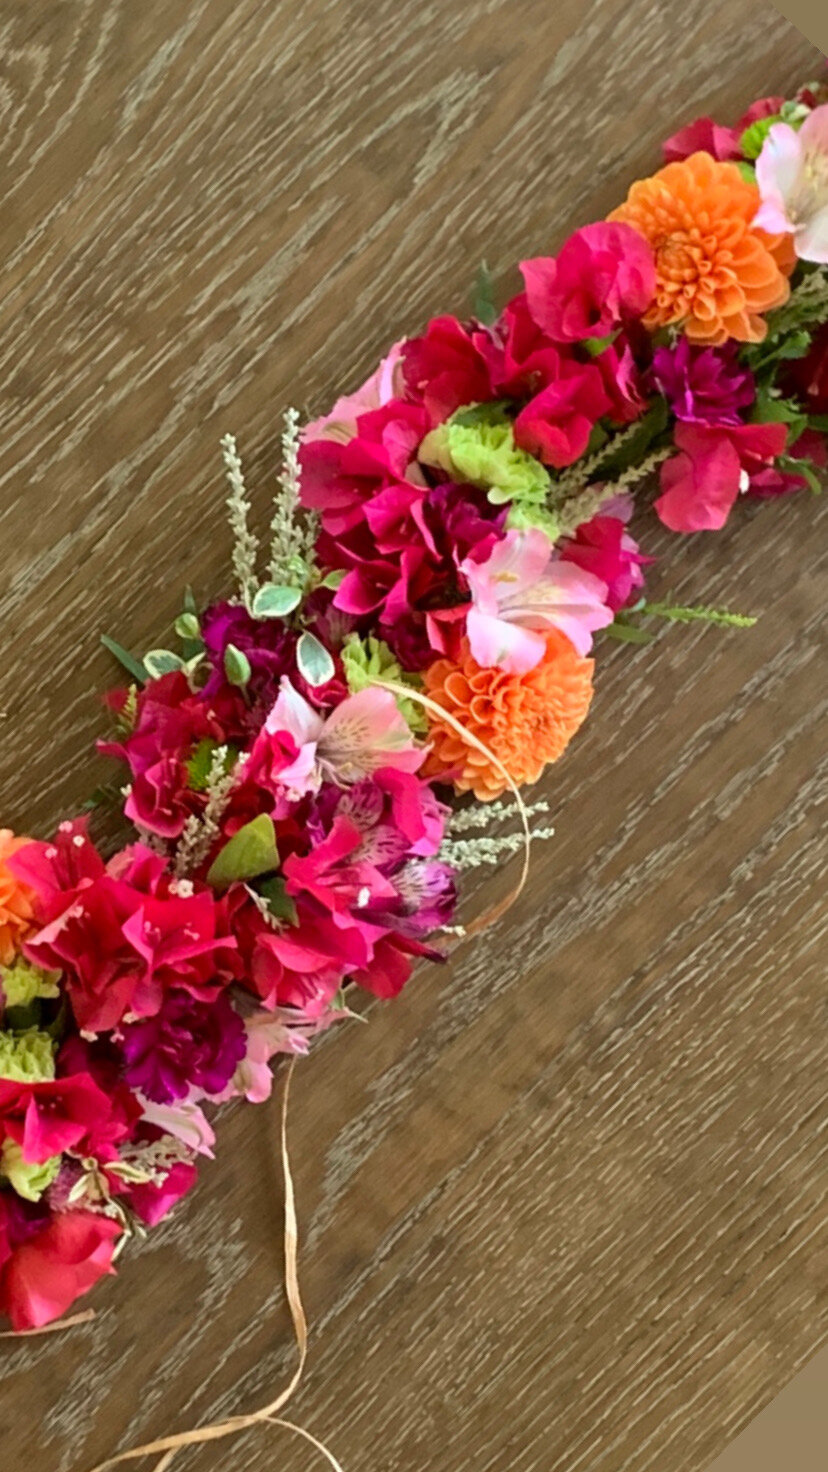
A Haku Lei might be one of the most beautiful types of artistry, in my opinion. A floral necklace or crown each created with natures best for the season? I mean?…. A mixture of textures & colors, using only natural resources- no glue gun or ribbon required; who doesn’t love that!?!

Now there are many types of leis and a common one would be the Kui lei. These leis are made by using a long needle where you string your flowers and they are much easier to make than a Haku but they are not nearly as full and lush either. A Haku lei however is made using raffia, first braided and then adding small floral bundles wrapped in a continuous pattern… bundle, wrap, bundle wrap…

There are few tricks to these beauties I have learned along the way, so before I show you how I make mine, let me preface a few things to consider:

  1. These are time consuming and really should be made in one sitting

  2. Choose flowers that will last (Bill Char says to only use flowers that look good after 5 minutes freshly cut out of water.)

  3. Be in the right mindset; you can not rush art and the more tense you are, the more you will be breaking your raffia as you go.

Kui Lei

Used by stringing flowers.

Haku Lei

Each flower hand wrapped using raffia.

Let’s get you ready! Here are the steps.

IMG_1101.jpg

Materials:

Raffia, flowers, greens, clippers, bowls or trays

Step 1: Try to have your flowers and greens cut ahead of time. Use trays or a table to lie things out. Typically, you will need things to have 1.5”- 2” stems. This is a huge time saver!

Step 2: To start, take 4-6 long pieces of raffia (maybe 60” long or so). Tie a knot at the end and then braid your raffia down about 8”. Then finish it with another knot. Then make a loop using just your braid and tie again.

Step 3: Begin bundling 2-3 sprigs of whatever you want and place below the last knot along the loose strands of raffia.

Step 4: Using one hand to grip your bundle on top of the raffia, take one strand of raffia from the bundle and cross it over and back over your bundle. Keep it snug and then repeat. That same piece of raffia will continue to wrap over the bundles and your other group of raffia in grip. NOTE: To keep things flat and tidy, try to keep your work close to the edge of the table. This allows for your lei/garland to grow, stay flat and stay tight.

Step 5: if a piece of raffia rips or you run out of room, simply use another one of your strands and just bring it into rotation. (sometimes I would just cut another long piece of raffia and add it into my group to make sure I always had 4-6 strings in my grip at all times)

Step 6: When you have reached your desired length, tie a knot on the back side of your last bundle. Take another of your strands and wrap and tie. Make sure it seems snug and tight. Then braid the remaining raffia and tie a knot again.

That’s it! Once you are done, give them a little mist with a spray bottle and keep them in the fridge away from veggies and fruit, typically on the bottom shelf so they don’t get too cold!

In all honesty, I forget each time I sit down to make these how labor intensive they can be. It is for that reason, I hope that every one really understands how special these are to make for someone else, to give or even receive. There is no way around it, a lei can only be made as a labor of love!

WANT MORE!

I follow a couple lei making masters on Instagram, one from Hawaii, @meleana_hawaii and another from Los Angeles, @leisyleilani. I am always in awe of their work and just the clear passion for making these beautiful living art pieces. In addition, there is a lei making master, Bill Char on YouTube and No JOKE if you need any sort of tutorial, he is your go to! Here are a few of my favorites.

https://youtu.be/ZQ4X7IhtasU
https://youtu.be/kFcw1nG5djk
https://youtu.be/m6t-PvCLfo8


Summer; The Annual Reunion For The Fun Colors

Years ago I worked with a client, Ann, who was really big on personal color analysis . Have you heard of this? I think I am a “Dark Autumn” and my colors include crimson, plum, and different hues of umber and sienna browns and yellow ochres. In short, it is a list of colors that look best on you based on your tones and undertones of hair, skin and eyes. Honestly, I think most people can look at the charts and identify what their color palette is just based on the colors you seems to get the most compliments on when wearing. The quizzes are fun to take, regardless.

This specific client however, took it to the next level explaining to me that there is psychological side to color and insisted that her home needed to be in line with her personal palette because it “clearly was the colors that made her feel best.” So a combination of Light Summer colors it was and we designed every thing in hues of pastel pinks, beige, muted blue/ greeens, and then pops of brighter Summer colors in corals . It wasn’t my favorite color palette for the home and especially during that phase in interior design when everything was Tuscan but she loved it and it did all come together in the end.

So I may not always design to a specific color palette for events or my home, but I certainly do have my favorite color schemes for each season and of all of these, my favorite is most certainly, Summer. Why? Well, in Summer, just about any bright cheery color goes! What other time of the year does coral get to be friends with happy yellows, lime greens team up with baby blues and poppy pinks pair with a true orange? For three solid month, these colors put all hard feelings aside and just hang out like family.

Well in the spirit of Summer approaching, I may have jumped a little ahead when I was asked to style this end of the year party for 12 fifteen year old Girlscouts. With free rein for colors and a limited budget I opted to use this brilliant rich pinky-red FREE bougainvillea and bright hues of oranges (literal too) with pops of fuchsia and pale pink peonies. (I mean, when do peonies and bougainvillea ever get to hang out either!)

Fun colors right? And the chandelier, such a great wow factor for any party!

A fresh bag of oranges and foraged eucalyptus never looked so pretty and it was a perfect way to keep costs down.

A fresh bag of oranges and foraged eucalyptus never looked so pretty and it was a perfect way to keep costs down.

IMG_0747.jpg

It’s In The Details

The deep marine blue anchored the color scheme a bit and using the rag yarn kept things playful. I made these small place cards using a photo of bougainvillea and the program Canva. Using small cuts of the same image in varying hues allowed for things to look cohesive but each one a little different.

IMG_0729.jpeg

The Summer Reunion

What other time of the year does coral get to be friends with happy yellows, lime greens team up with baby blues and poppy pinks pair with a true orange? For three solid month, these colors put all hard feelings aside and just hang out like family.

IMG_0700.jpg

The WOW Factor!

This chandelier has become a God send! I have finessed a metal canister to the inside of the fixture so I can place fresh cut flowers. The moss covers the vase and allows me to hide the ends of other greens and flowers outside the vase.

IMG_0762.JPG

What a way to celebrate!

Thank you Girl Scouts for letting me part of the fun!


Want to take your own Seasonal Color Analysis Quiz? I liked this one and it didn’t require an email!

The Perfect Place Between Camping and Glamping

I have been camping pretty much my whole life.  However, I am neither the backpacking type with only my pack and a bag of trail mix nor am I the diva "glamper." I fit somewhere in the middle and I am here to tell those of you, "no way/ no how with I ever camp" folks, there is a magical place in-between.  This place allows for you to actually relax; unplug (literally) and experience nature in a whole new perspective. Before I start,  I will let you in on a little secret; the big difference between the survival training- bring only trail mix camping and diva "glamping" comes down to only one thing; stuff.

In our twenties, my husband and I started out simple; we had a tent, two sleeping bags, a cooler and a bin marked “camping stuff.”  As we got older we realized, there is nothing fun about camping on the cold hard ground so we started to upgrade to two bins, an air mattress, a camp stove and a larger cooler.  Fast forward a few more years, we added two carseats in the back along with enough stuff to fill a small apartment.  In addition, we had become self proclaimed, “foodies and wine snobs," so the menu required endless ingredients, prep, storage and a whole lot of work.  (BTW- we now know we are NOT foodies nor wine snobs). 

It all came down to STUFF!  So much stuff and in case you don’t know, when you pack a car with stuff, especially to go camping, you come home with a whole lot of stuff to put away.  However, unlike a normal vacation, all of that stuff, including your car smells like campfire smoke and it has a layer of dirt that doesn’t always go away in the first wash.  

Needless to say, camping became exhausting from start to finish.  

I've really sold you now. LOL- bare with me.  

The truth is camping does not need to be like this! Camping is intended to unplug (leaving the video games, laptop and Keurig behind), explore, discover and just breathe. It is an escape and an inexpensive one at that! But, you have to be smart and frugal about what goes and what stays behind.  My sister and brother-in-law taught me this and it works! When it comes to camping, as you pack and prepare each and every item, ask yourself, “should it come along or stay behind?”  Less means less to deal with, clean and put away! 

So let’s discuss the basics to achieve this magical “in-between”…

Location: Keep in mind, like hotels, campgrounds range from 5 star down to 1 star, figuratively speaking. Determine what your comfort level is and what scenery you want to experience. If you are looking for super clean restrooms and a hot shower, don’t look for the remote campground that doesn’t require a reservation. (however if you find one, please share!) If you seek solace and a room (tent) with a view in the woods to star gaze or you want to meet up with 10 families close to home for the weekend, there is a place out there for you! You just have to look and sometimes plan ahead!

unsplash-image-0RanOcSEpAo.jpg

Camping: Where Every Room Comes With A View!

Food: I find it so funny when you look at the camping food blogs and find things like tacos, breakfast burritos or hobo stew. Delicious of course and I love them all, but this is so much prep to chop, dice and store. Save your sanity and think simple!!! For dinner, think grilling. Consider a nice cut of meat and a veggie. For breakfast, skip the frittata and go with bacon and eggs (already whisked and stored in a jar). If you seek fancy, just think quality over quantity! That’s it. All in all, if it has more than 3 or 4 ingredients without spice, it’s too complicated for camping unless it was prepared at home. Just remember space and time is of the essence when camping! In addition, always bring a good sturdy cast iron pot or pan, bbq tools and a pot holder. Your pan will most likely be on direct flames so it needs to be able to withstand crazy heat.

Sleeping Quarters: Enjoying the outdoors can be a little hard at night, especially if you live in a busy city. The absolute quiet and pure darkness can be daunting, to say the least. Add in the noise of a mosquito, a rustle in the tree, an animal call in the distance; freaky! So, it is an absolute must to have a comfortable sleeping bag or blankets that are weather appropriate, a pillow and some sort of comfortable mat to avoid the achy back in the morning. It is also key to remember, all of those sounds belong to your surroundings and those creatures want just as little to do with you as you want with them. The only caveat is this: put your food away properly. Leaving food out or easy to access is like offering room-service to hungry critters.

The Unknown: Yes, there needs to be the emergency kit with a few little extras “just in case.” Make sure you have plenty of water, matches or a lighter, extra batteries for the flashlight, a first aid kit, dry food like granola bars, toiletries including TP and utensils like a good knife and a wine opener (super important). Also, make sure someone back at home knows exactly where you are and your whole itinerary. If you loose cell service, someone needs to know where to find you and help!


Are you ready to camp?

I will never tell people camping is easy. It’s dirty, it takes some work and often times, careful planning. No, camping is not a weekend at the Ritz but it’s not supposed to be. Instead, camping offers a front row seat to some of the most spectacular places, untouched, quiet, and beautiful places. It usually is inexpensive too!

So when you are ready for the adventure, just be sure to pack light; take only the essentials. Be sure to pack the right food, the right bedding and make sure you don’t forget the wine opener!

unsplash-image-E_2-xZDoy1M.jpg

happy camping!

Sweet & Savory Watermelon Summer Salad With Walnut Oil Vinaigrette

I don’t know how to follow a recipe to save my life, which is why no one asks me to bake; ever. However, I will admit, I am pretty good at flavor pairing which is perfect for a home chef like me. Let’s try a little of this, a splash of that, a whole lotta this and BAM… Dinner!

IMG_0060.jpg

In addition to flavors, I am a big believer in all things pretty and most definitely food is included. If you look at my Pinterest board, “Recipes,” all you will find is BEAUTIFUL food. Those recipes are just a reference for me, a mere suggestion, never-the-less, inspiration for whatever season, flavor and even color palette I might want for my next meal.

While I may never be able to replicate last Tuesday’s late night dinner, I do have a few go-to’s that always work and seriously, no matter how many dashes or splashes, it never disappoints. This one specifically, I believe is due to my secret ingredient; walnut oil. I actually order walnut oil on a subscription through Amazon because I love it so much! It just adds that nutty flavor, making it one of those fun…”I can’t put my finger on what that flavor is, but it’s delicious,” games I play with fellow home cooks. My second secret ingredient is sorrel and if you haven’t tasted it, you need to! It is a wonderful lemony tasting herb that is easy to grow here in SoCal and add an incredible garnish or layer to so many dishes. I have two varieties growing, both of which I purchase from Plant Depot in San Juan Capistrano. If you buy sorrel, be sure to buy the green varieties as the red veined ones taste bitter and not lemony.

close up of walnut oil.jpg

Meet Watermelon Salad; The Serious Wow Salad That Everyone LOVES.

Ingredients:

1 Small cold seedless watermelon (cubed or speared)
1 Large Cucumber (chopped in cubes or slices with or without the skin)
1/2 Red Onion (cut in thin slivers)
2 Green Onions (chopped
1 or more cup of Cherry Tomatoes (cut in half)
Sorrel (Basil works too)
1 1/2 cup of Ciliegine Mozzarella or any kind of Mozzarella (cut however you would like)
1/4 cup of White Wine Vinegar (balsamic or Champagne vinegar works too)
1/4 Walnut Oil (Olive or Grapeseed work too)
Salt & Pepper To Taste

Recipe:

Step 1: Add all veggies and fruit into a bowl

Step 2: Combine your oil, vinegar, salt, pepper and mix well in a separate container to make a dressing

Step 3: Add Sorrel, and mozzarella to your veggie/fruit bowl

Step 4: Gently toss all the ingredients with the dressing

Step 5: Add Salt and Pepper if needed

Serve Immediately

Note: This salad is best if assembled right before you serve it but I have chopped everything up, left the mozzarella and sorrel on top and popped it in the fridge for a few hours before a meal. Just be sure to dress it right before you serve.

Amazing right? It is crisp, both savory & sweet….and super pretty!!!!

chopped.jpg

It is crisp, both savory & sweet….and super pretty!!!!

IMG_0074.jpg

Also Try My recent variation and perfect for your Vegan Friends!

Watermelon, green onions, snap peas, cherry tomatoes, edamame (shelled) and pink radishes!

SO GOOD!!!

3 Key “Musts” To Planning Your Bathroom Remodel & Staying the Course

Everyone loves a good before and after and my bathroom may be my very favorite! Bias of course, but if you are anything like me, my day ends in a a hot bath. Therefore, having a master bathroom just the way you like it… it’s magical!

There are 3 Key “Musts” to Planning Your Perfect Bathroom Remodel or any remodel for that matter. These tips may not solve all of your remodel challenges but rest assure, if you stick to these 3 things, you will be set up for success and your contractor will love you!


NUMBER 1

Know Your Function and “Must Have” List

How it Started Funny Dogs Comparison Photo Meme (2).jpg

There are a lot of things to consider when remodeling but, understanding function is number one. Know what you really need based on your specific lifestyle, habits, and even schedules. Take all things into account and create a “most wanted and must have” list. Keep in mind, you can dream up the most amazing space but a well designed room should meet both your function and your vision. Does your plan check all the boxes?

Here are a few examples taken from our list:

  • For us, my husband gets up earlier than I do so I most certainly wanted to add a door to close off our bedroom.

  • Natural light in a bathroom is a must for me, so we added a sky light.

  • An absolute! We wanted to make sure you could not see the toilet from our bedroom looking in. (Duh)

  • As for the shower, my husband requested a fairly enclosed space to ensure extra steam.

  • Smart closet space; everyone’s struggle. We asked to get rid of all sliding closet doors (hate those track things) and add more drawers and cupboard space.

  • I have to have a cast iron tub; no ifs ands or buts. (Sign-up for our weekly newsletters to hear all about my ball and claw tub fiasco)

Simple+Floral+Image+Spring+Quotes+Instagram+Post+%281%29.jpg

Get Creative!

I like an eclectic look. Specifically, a balance between modern and traditional (aka, somethings old and somethings new). The color scheme needed to be simple and classic with wood tones to warm things up a bit. We had seen a herringbone tile like this in magazines but when we went out to find it… it just didn’t exist. Instead we found squatty rectangular tiles that just wouldn’t suffice. In the end, we found a tile shop willing to cut 12'“x24” tiles into these long 2”x24.” Because we asked around and knew what we wanted, we got what we envisioned using a very inexpensive basic tile and with the cost to cut it all, we still managed to stay on budget.


NUMBER 2

Create Your Design Compass

Next up is the overall aesthetic. This is by far the most fun to research but the hardest part to commit to. If you are not on Pinterest, this would MOST definitely be the time to figure it out! Pin everything from paint colors, materials, to overall aesthetics. Be mindful to choose a solid mix of colors, materials and textures to keep things balanced. Once you are feeling solid, put your best photos together (I usually screen shot everything and use Keynote or Word). You now have this inspiration/ mood board/journal/diary (whatever you want to call it)! Okay, print it out, save it on your phone and drill it into your brain, “THIS IS THE PLAN AND IT WILL LEAD YOU- IT IS YOUR DESIGN COMPASS.”

master bath.001.jpeg

NUMBER 3

Commit and Stick to the Plan!

So you have a plan, and that might sound easy enough but it’s not! I think everyone has a panic attack when it’s time to fully commit and that self doubt is often when I get that emergency consult call. “Sarah, they’re coming after me and forcing me to decide!”

Let’s see… here are a few example of when we crumble.

  • The painter is coming and I think I chose the wrong color

  • The contractor needs the fixtures but should I change from this finish to this finish?

  • Will it be too busy?

  • Will it be dated in a year?

  • Am I crazy or does this look…?

Stop stressing! You did your homework, you know what you like and your bathroom does not need to look like everyone else’s! You had a solid plan, now stick to it! That inspiration diary needs to be your design compass. If you stray away, you will be headed down the rabbit hole and, more often than not, you will wish you had just stuck with plan A in the end.

Breath, take ownership of your design and stick to the plan. (Free therapy right there)

57513681216__A40A0FCA-F65E-413D-B517-35C67EECC387.jpg

Can You Visualize It Now?

If there is ever a time to pat yourself on the back, this is the time! Seeing your space in the raw like this allows you to visually understand and recognize that the materials you chose are most likely perfect! You are going to end up with your dream bathroom just like you had hoped!

 
IMG_1743.jpeg

Planning and living through a remodel is not easy and I am not going to tell you there will not be unforeseen changes that need to be made along the way. I will tell you however, that if you stick to these 3 Musts for Planning, your path will be much smoother!

  1. Know your Function and “Must Have” List

  2. Create Your Design Compass

  3. Commit and Stick to the Plan!

It’s been over two years since this remodel and we still LOVE our bathroom. It might not be everyone’s taste and that’s okay. It checked all of our boxes and it’s because we planned and committed to what we knew we wanted. Next up… Oh how I hope it’s in the near future… the kitchen!

 
IMG_1758+2.jpg

Let In The Light!

Our bedroom is not always the brightest. In our original bedroom/bath, there was no door to close things off. We knew we wanted a door for privacy but more so for noise. Once again, everyone thought I was a bit crazy, to add this heavy wood french door. We may not get the most privacy, but it allows us to close things off and still get the light in the bedroom. I did buy a product to frost the panes but I am not sure want to use it now.


IMG_1739 2.jpg
 
IMG_1755+2.jpg

Adding In Warmth

In a very old Pottery Barn catalog, I had seen this wood ledge in a bathroom and I loved it. It really doesn’t serve much of a purpose but it seemed to break up the materials in a softer way. A bathroom can easily begin to feel cold and sterile but by adding in plants, wood finishes or rugs, we can warm things up a bit.

 
5161EC50-B575-4E74-B1A2-938602FEB9EC 2.JPG

Old With The New

I searched the world over for the perfect light fixture over the tub. I wanted something unique. Everything I found seemed like the actual electical components were sketchy. So, I went to Home Depot, bought a very basic pendant light and used this vintage globe and finial I found at the flea market for $40. When it lights up, the room illuminates with the most beautiful pattern. It’s also on a dimmer so even if I don’t use a candle, the glow is perfect for my spa like bathroom.

Simple Floral Image Spring Quotes Instagram Post (2).jpg

Want More?

Sign up for our Friday Newsletter. This week, is all about the cast iron tub that never made it into our master bath.

Just a place to get to know Society Picnic better.

Gardening Up With The Elements Of Design; DIY Vertical Garden Planter (2 Days/ $500)

I will admit, we are VERY fortunate to live here in Southern California and it's not a lie, the weather is nice 90% of the year. This means, our outdoor spaces are often times just as important as our indoor spaces. Our home is considered a zero-lot-line home. Not familiar? Basically our property is separated from our neighbor's, literally, by the one side wall of their house.  Sounds like an eye-sore- YES it is!!! There is 50ft beast of siding right outside our side door and it's not even in the same color as our house. 

Okay so there is one eye-sore, but we LOVE the rest of our house and especially our backyard. The previous owners planned it out just right and we have a wonderful outdoor fireplace, a built in bbq; honestly a perfect layout for entertaining and relaxing. We spend hours enjoying the sun, sipping wine by the fireplace or even keeping up our garden at the back of the house…but that side yard…it was completely lack luster.  I tried everything in the book to help and I pride myself on design challenges, (especially the "work with what you have” ones) but designing this space was a nightmare.  It is a designated outdoor dining space, but in the last 3.5 years we have lived here, it has had maybe a handful of dinners… all of which I was preoccupied with brainstorming on how fix the awkward space. By all accounts, this has been (or was) deemed our dead zone.

We are not the only ones. I am pretty sure everyone's home has a dead zone. You know that space in the house no one seems to go. Sometimes it’s because it doesn’t have a real purpose or it’s extra space you really don’t need (a luxury if you have a home is SoCal). However, more often than not, and perhaps unbeknownst to you, the real problem with your hexed space is actually phycological. 

When you find a space that is really uncomfortable, most likely something is seriously violating a basic principle or element of design. In my case all of the elements were in breach.  Believe it or not, those artsy types in your life that make things beautiful are actually, knowingly or not, following a rule book. If the rules of good design are not followed, your psyche will tell you to get out- it's just too uncomfortable! For our space, every single one of these Elements were in violation and something had to be done! 

Here are the "Elements of Interior Design." (Before the planter)  

Take a look at my list of violations.

  1. Balance (The tall wall dwarfed our dining area)

  2. Emphasis (All that was emphasized was 50ft of siding)

  3. Contrast (The wall color is almost the same hue as our gray house but the neighbors house is more of a brown)

  4. Rhythm (As of now, there is nothing in repeat except siding… wow!)

  5. Scale and Proportion (Even with an umbrella up, the scale is just all wrong)

  6. Harmony and Unity (Don't even get me started)

  7. Details (Does siding have a means to show detail?- I suppose termites could help that out but not the direction I want to go)

Okay so you get the point, this was a serious problem and I was determined to find a solution.  I will admit, in a perfect world, I would have invested in hardscape planters with tall trees but I had a $500 budget for this entire space and that meant I would be the one building it and planting it.  

Overall, I am really happy with how it turned out.  I still need to add in a drip system; all in good time.  This planter, visually breaks up the gigantic wall and I like how the plants will drape downward from the top two tiers (as they grow).  This will also help your eye travel down to our intimate dining space.  I added market lights as well which will add just another element of ambiance and keep things visually low.   So did I solve all of my challenges regarding good design? Here are my attempts to following the rules.

IMG_4773 2.jpg

Here are the "Elements of Interior Design." (After the planter)  

Take a look at my list of fixes.

  1. Balance (the mass of this entire planter, in proximity of both my house and my neighbors created more balance)

  2. Emphasis (Instead of siding, you now are looking at something more natural and beautiful and the emphasis was visually brought down into the dining space rather than up between our homes)

  3. Contrast (The plants of wood structure break up the monotony of two giant walls of siding creating contrast)

  4. Rhythm (I used repetition on the position of each planter both vertically and horizontally)

  5. Scale and Proportion (The height and width of the new planter, along with the market lights, adds enough visual weight to help ground the whole space and keeps the scale and proportion in tact)

  6. Harmony and Unity (Using a mix of textures, colors and materials, we achieved more harmony in the space)

  7. Details (Certainly we need to add in a few more layers but the mixture of plants certainly was a start)

IMG_5237 2.jpg

Do you have a dead zone? Why pay rent or a mortgage for a space that does not serve it’s purpose? Right? I will never be able to completely solve this design challenge (like cutting off half of the neighbors house) but I can certainly remedy quite a few of the issues. We have already used that space quite a bit since building this planter and I’d imagine as the plants fill in more, it will make the space even that more inviting. Next up, add in a drip system, some candles, more plants throughout the space and a new market umbrella (one with the cute tassels or fringe). It’s a process! Thank goodness for me, it’s a labor of love though.


4 Steps To Making Your Party Charcuterie Board & Perhaps The Easiest Woodworking Project EVER

Has anyone figured out why we call these wonderful things charcuterie? Yes, I understand it is a French word but why the popularity of the term? There was a time when we just called them appetizers, hors d'oeuvres or crudités. Right? If you actually look up the term ”charcuterie,” it really only involves cured meats.  I don’t know about you, but my idea of a “charcuterie” board involves a WHOLE lot more than meat; it includes such things as, veggies, cheese, crackers, fruit, chocolate, nuts, and/or anything else that is snack worthy. 

After careful consideration, I have come to a conclusion. In my mind, the one thing that seems to set “charcuterie” apart from the average cheese platter; it’s the actual presentation, the board and the art of how to pile that board just right. It is an art and I would bet anyone who has attempted to “charcuterie," understands the woes of artistically arranging, but also to transport these beautiful boards of wonderfulness. 

The trick is this my friends, create walls to your board before you begin placing. You can use whatever you have on hand, cardboard seems to work best if you have the time to cut strips and tape it around the parameter.  The beauty of this, is that of course it keeps everything contained but it also makes for easy transportation. Once you have arrived and ready to display, simply remove the outer edging.  Perfection!

Obviously, there are a million options but here are my favorite delights for a perfect charcuterie board.

Charcuterie Suggestions:

Nuts: almonds, pistachios, pepitas, pecans
Berries: raspberries, blueberries, strawberries, blackberries
Cheese: (a mix of hard and soft) Manchego, Parmesan, Harvarti, Brie, aged cheddar, goat cheese
Cured Meat (of course): Serrano ham, chorizo, prosciutto, salami, capocollo
Sauces: honey, mustard w seeds, jam, pesto, marmalade
Preserved: hearts of palm, capers, olives, pickles, sun dried tomatoes green beans
Breads: crusty baguette, sliced toast points, crackers, breadsticks
Fresh Fruit: melon, kumquats, pear, apples, plums
Veggies: cucumber, beets, radishes, jicama, carrots, cherry tomatoes, asparagus
Sweets: dark chocolate, dates, dried apricots, dried cranberries

Okay, so you know what to buy… but where do you get one of these wonderful so-called boards?

Ready to go next level? Why not just build a charcuterie board of our own?  For those of you who just cringed at the idea of a saw or the word “build,” I would like to show you how, in fact, this is THE EASIEST WOODWORKING PROJECT! You can do it! It’s actually easier than buying all of the charcuterie essentials and much easier than arranging! Scouts honor! 

Are you convinced? Of course you can always use a platter, but I love the look of a board. There is something so organic and beautiful about curating atop of a beautiful piece of natural wood.  My board was a simple cut of a pecan wood. Walnut, maple or even oak would be gorgeous too!  They typically sell these, along with other beautiful wood varieties, at your local home improvement store.  At Home Depot, hardwoods are sold by the foot, so you will not end up with any extra scraps either.  Another note; Home Depot can also cut the wood for you and in my experience, the first 2-3 cuts are free! My board was 30” with two 1” legs. The depth of the board is up to you.  For storage purposes, I opted for an 8” in depth.   

In closing, now that we know what to buy and how to make one, I suppose all we need now is a reason to use one.  Charcuterie doesn’t mean you have to have a party (but honestly, who doesn’t want one? After all, it has all of the food groups; why can’t it just be dinner?!  I am headed to Trader Joe’s tomorrow.  Let me know if I can pick anything up for your charcuterie board? I’ll bring a bottle of wine over too. Just tell me what time.

Why Setting A Formal Table Is Not A Thing Of The Past; Pull Out That Fine China

Why Setting A Formal Table Is Not A Thing Of The Past; Pull Out That Fine China

Setting a formal table for everyday dining may be a thing of the past, but setting a formal table for celebrations reminds us to slow down, enjoy each moment, each bite and each person we have gathered to celebrate. Look at all of the components of a formal table, literally each dish is a reminder, in courses, to take your time. So for your next celebration, slow things down, pull out the china.

Read More