Fresh Colors & Designs For Decorating Your 2021 Easter Eggs; and Not Just For The Kids

IMG_4668.jpg
IMG_4712.jpg
Screen Shot 2021-03-19 at 9.16.20 AM.png

Need a lazy day and a creative project? Grab these few supplies, queue up the movies and cover the coffee table. Today is Egg Decorating Day!

Question: Has there ever been a time in your life when you had to use kids as decoys so you could do something the world deemed “Intended For Kids?” Maybe I am the only one, but I will admit, on occasion (maybe more than a few), I have made the call to my sister, “Anne, any chance I could take the kids for the night for some Aunty Sarah Time?” Of course I wanted to see them but it’s like a two-for-one! I REALLY want to see that Pixar movie that just came out and they are literally and figuratively, my ticket in. “That will be 1 adult and 3 kids for The _____ Movie.”

Well, movies are not the only thing reserved for kids. It’s most holidays, right? Certain activities are intended for kids; pumpkin carving, egg hunting, trick-or-treating, ginger bread house making and even hand-print turkeys. However, Easter Egg Decorating, is one thing, grown ups and kids alike should take part in. Unlike the handprint turkey, you might actually, want them to be part of your permanent Easter decor for years to come.

So Grayson, Ben & Ellis, I am sorry Aunty has used you for a number of movies, crafts and activities. I will make it up to you. Anne, can I borrow the kids one night this week? I’ve got these Easter Eggs to decorate.


in honor of 2021, a fresh start, and perhaps in need of a creative outlet, I am going to give you permission to do this one Easter craft. It is therapeutic, easy, and perfect for a coffee table/ movie activity with the kids or Not. No judgement.

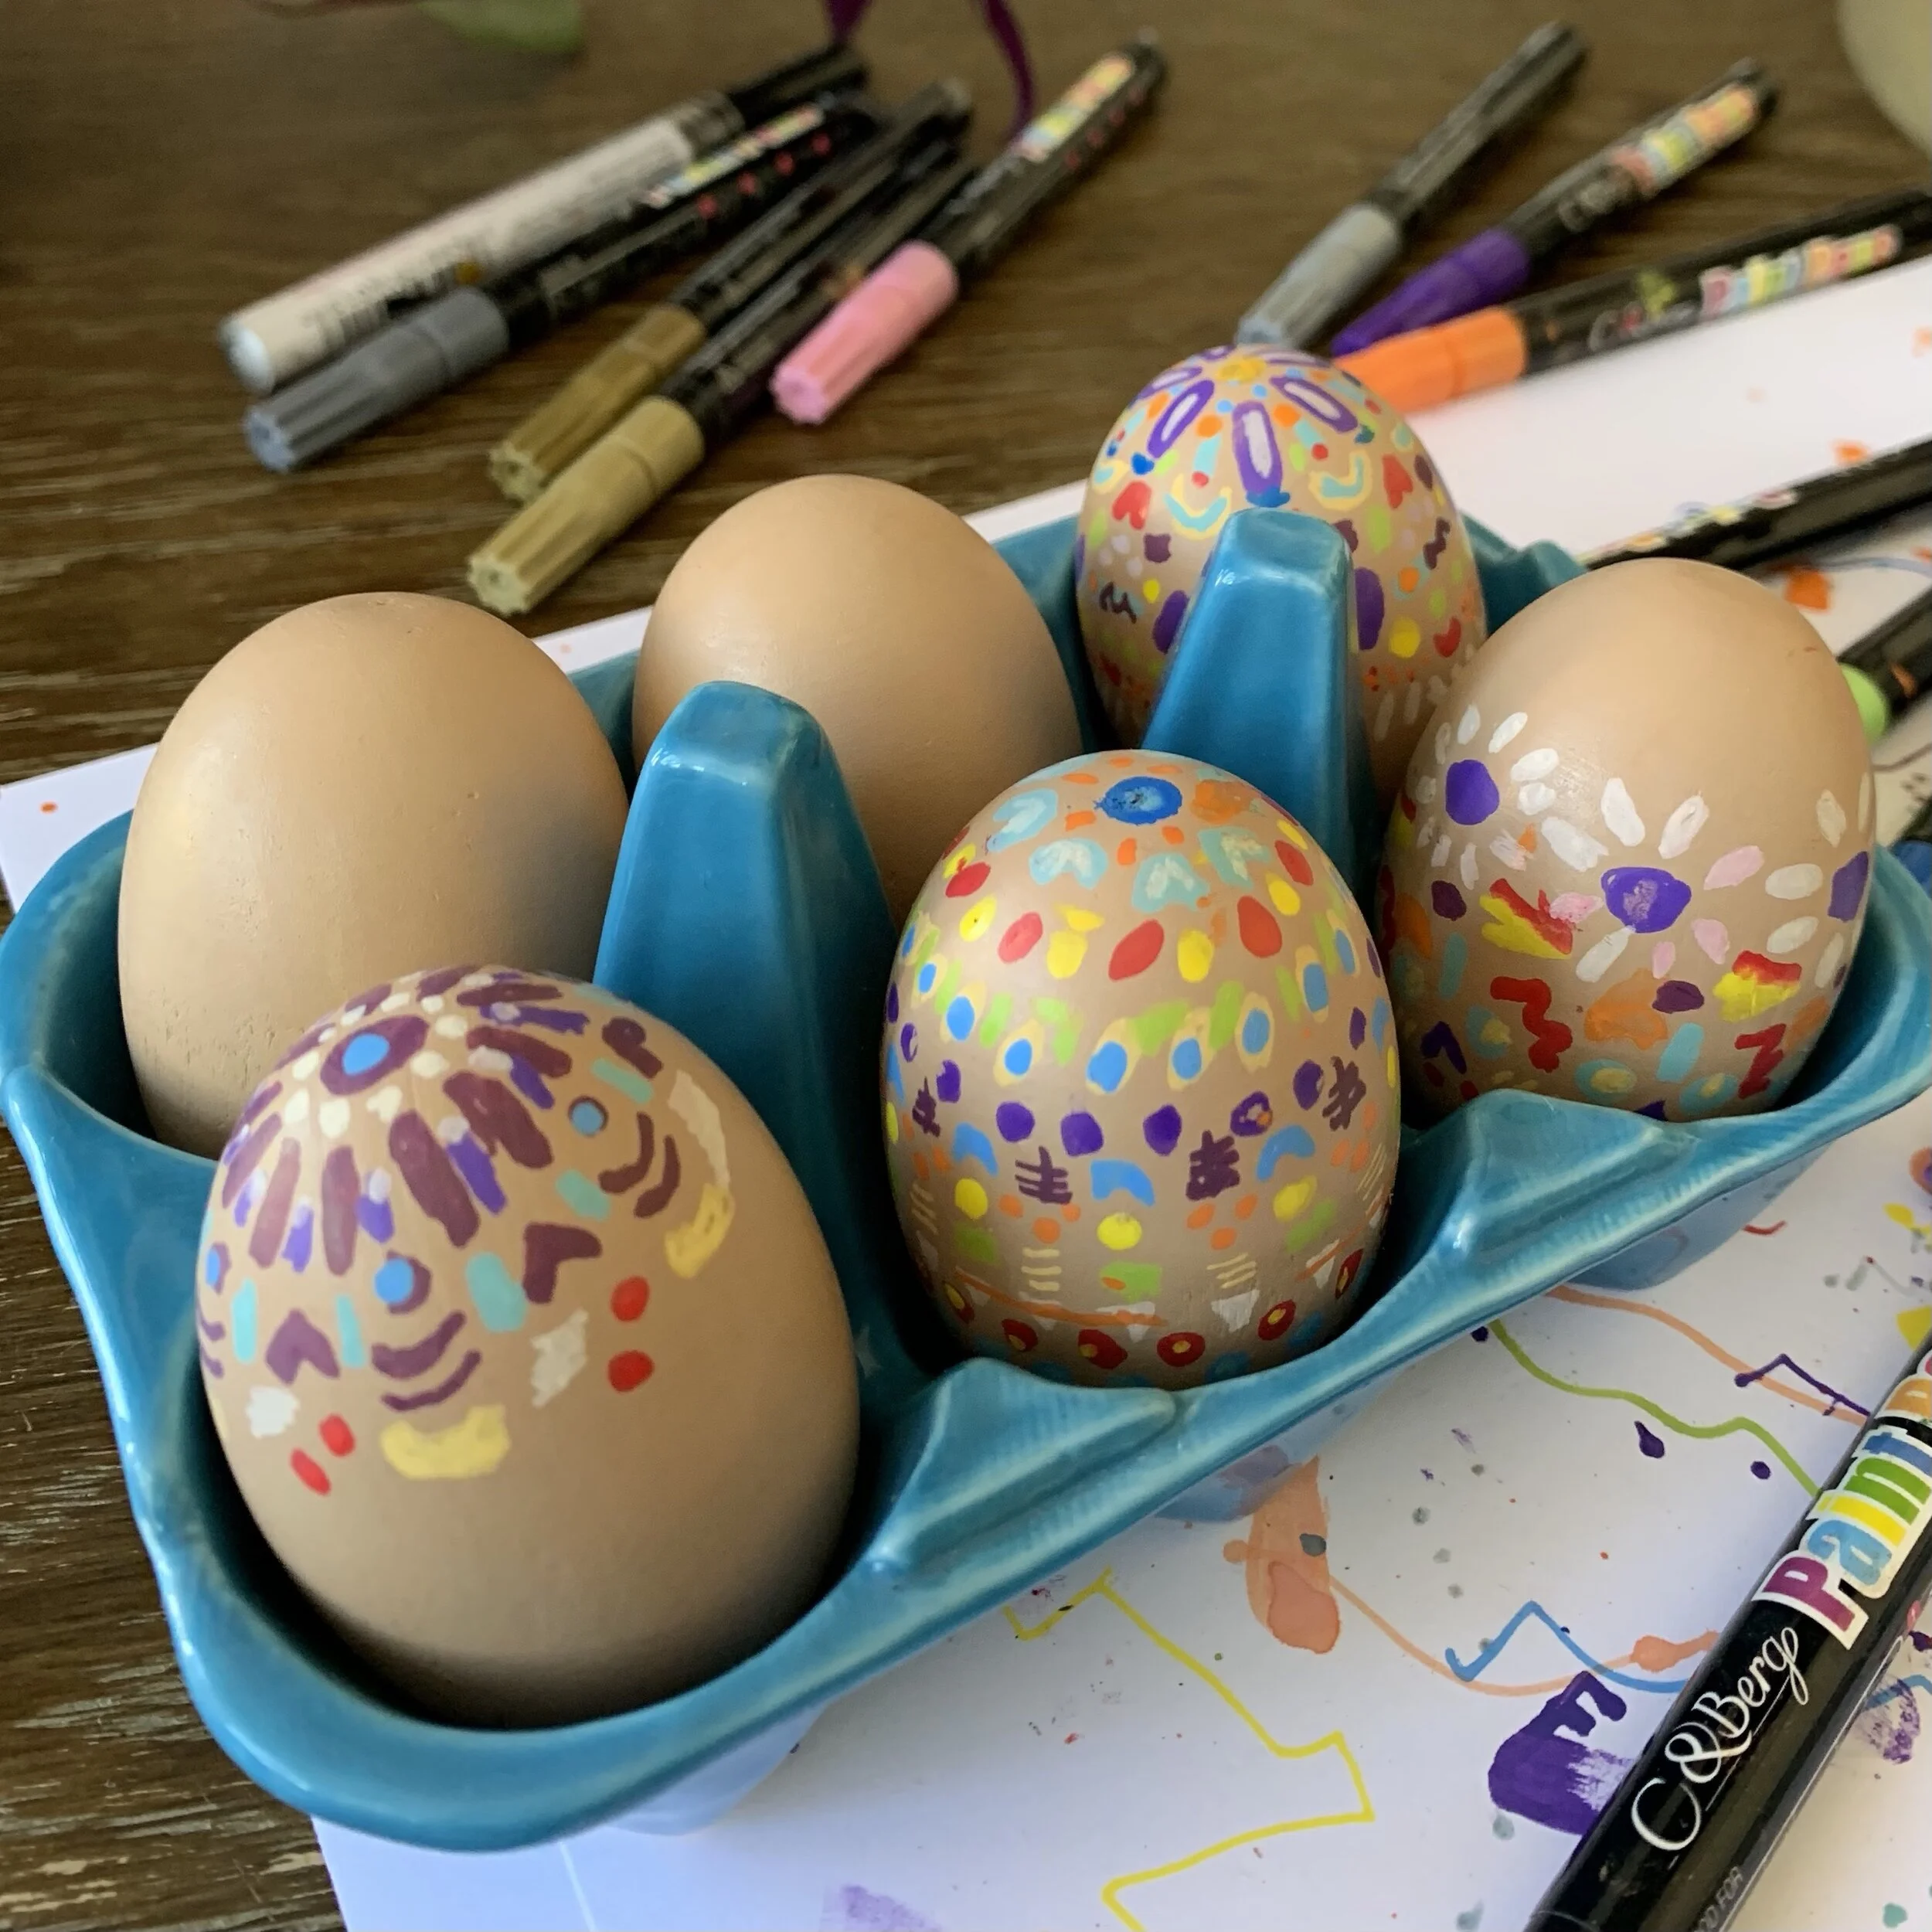
Take a look at two color schemes, during two different “show catch-up” sessions did for me. (This Is Us & American Idol- if you must know)

Materials:

  • Dyeable Plastic Eggs or Wooden Eggs

  • Paint Markers

  • Egg Dye

  • Clear Acrylic Spray to Seal

Directions:

  • Dye your eggs (basic dye only- nothing tacky or glossy)

  • Start designing your eggs (click here for design inspirations)

  • Spray with Clear Acrylic

Styling Bookcases or any shelving; 5 Tips & 6 Steps To Successfully Curating beautiful Shelf Displays

Styling Bookcases or any shelving; 5 Tips & 6 Steps To Successfully Curating beautiful Shelf Displays

Book shelves, china cabinets, floating shelves or built-in shelves; it does't matter what kind of shelving it might be, it's hard to come up with the perfect composition to display your treasured decor. Want in on the secret..?. There is really only one thing you need to understand and once you do you will not only be organizing shelves but you will be ready to tackle any design needs in your home.

Read More

Dried Floral Spring Wreaths

I love Spring and what better way to get in the spirit than to create something new for your home. This last February, I had the honor of working with my friend Tatum as we made sweet dried floral Valentine’s Day mistletoe. They have been hanging all over my house and it was sad to think of putting them away.

Well sometimes, a good thing should just keep going! These little mini bundles were also perfect to attach to a hoop wreath! Check out some of my latest creations. They were so easy to make too!

For directions, check out our Valentine’s Day Mistletoe Craft. Literally just make your bundle and then attach it to a metal hoop or these mini grapevine wreaths.

IMG_4429 4.jpg
IMG_4433 2.jpg
IMG_4424+2.jpg

11 MUST DIY Tips for an Epic Slumber Party For All Ages Plus Photos and Videos of Our Boho Themed Surprise Sleepover Styled For Teen Girls

Okay that was a mouthful of a title and some of you may wonder why would I be posting about a slumber party during Covid? Well, it’s simple. Covid will be a thing of the past (let’s hope sooner than later) and when it is, guess what everyone is going to need? A PARTY! In fact, I think we should all get planning now! So let’s get to it.

I find it funny that people call it a “Slumber” party when typically, you will have less sleep and more awake time together. Regardless, there are proper ways to get a Slumber Party just right and I can honestly say these tips apply to any pajama party no matter how old you are.  So whether you are celebrating a bachelorette, a birthday or just an excuse to get friends together, these 11 steps will ensure your guests will leave in utter awe and perhaps, next time, you will be on the receiving end of those cozy slippers.   

  1. Guest List-This might seem so obvious but seriously think about this. These people are going to be in your home, in your ear, in your space for a very long time. Who do you really want to be there?

  2. Cozy it Up! There is no place for hard chairs or cold floors during a slumber party. Everyone should be able to lounge and snuggle if needed. Don't have enough blankets or pillows? Ask everyone to bring their own. No matter how you do it, you MUST set the stage and it needs to be inviting.

  3. Munchies! Start with semi healthy, snacky stuff. You will get to the sweet stuff later. Trust me you will thank me. After all, you have ALL night. It's a marathon, not a sprint.

  4. GO WITH THE FLOW! Just like slow cooking, “Set it & Forget It.” Toss out the agenda and just have fun and let things happen. If there is something you really want to do, by all means have at it, but just make sure the whole night doesn't feel contrived and completely planned. These are your best friends, you always know how to have fun.

  5. Sleep-over Essentials- I am a big believer in going all out and here is where the fun shopping comes in. Why not gift your guests with a little sleep-over kit. If a kit is not in the budget, perhaps just a pair of cozy socks or slippers.

  6. Set the mood! Stepping it up a few notches on the details will knock you up to next level and your friends will be more apt to capture photo memories as well; I promise! Consider such things as lighting, essential oils, a fun canopy, coordinating blankets and even plants.

  7. Be Glitch Conscious! Worst thing ever; Entertainment Glitches. Make sure your movies are queued, the remote has good batteries, and the music is ready to go.

  8. Late Night Snacks- Ok, you have gotten through the crudités’ , now it’s time for the good stuff. I would assume you don't want people rummaging through your cupboards, so pack a small basket with all the good stuff.

  9. Sleeping Quarters-I have actually had my kids call me at midnight to come pick them up because they were uncomfortable on some floor mat. I will admit, we are all prima donnas in the Fisher house when it comes to bedding but one thing is for sure. No one wants to wake up with a stiff neck or cold. Just think ahead and coordinate what you might need your guests to bring or what you can borrow to ensure their comfort.

  10. Morning Musts! Let's be honest, some of us can sleep in and some of us can't. I am the latter. I have an internal clock and it goes off at 6:30am every morning and by 7am, if I haven't had my coffee and a small snack, it's going to be very bad day. So for the sake of your early risers, have a basket of grab and gos for your guests. Granola Bars, nuts, fruit, tea and COFFEE (ok maybe not for the little ones).

  11. Last but not Least (and maybe more for adults and teens-not little wee people)… & it’s not the expected, “Have an epic slow breakfast.” It’s simple and ONLY for you. Block out the whole day or at least 1/2 of the following day after your sleep-over. Clean up, enjoy the quiet, and then take a good old fashion nap. You deserve it! Breakfast would have been nice but everyone has different eating habits in the morning so I say keep that part simple and follow Tip #10.

UNADJUSTEDNONRAW_thumb_3f2a.jpg

Surprise Boho Slumber Party For a Teen Birthday Party

Though Delaney knew she was having a few friends over for her birthday, she had no idea Society Picnic was styling out her space while they were at dinner.  Here are a few photos of the fun and the inspiration board that helped keep us on track. 

Be sure to scroll down to see the video of the girls coming in!

Like it or not, The 70’s are coming back into Home Decor; Let’s take baby steps & Makeover this Disco Era end table

Like it or not, The 70’s are coming back into Home Decor; Let’s take baby steps & Makeover this Disco Era end table

A little funky but just right! See the before and after; 70's oak veneered octagonal table with gray glass. It was calling for a perfect makeover. Like it or not, that 70's style is coming back along with it's color schemes! Avocado colored sofas; not your thing? Don't worry, there are some great things we should welcome back from the 70's like macrame, florals, boucle and high waisted jeans!


Read More

Fabric Covered Mat Board; How To Secretly Elevate Your Art Work on a Tight Budget

Let me be frank, I am thrifty on a lot of things but especially when it comes to accessorizing my home. I can justify buying quality furniture as I consider these long term investments, but when it comes to all the decorative fun stuff, I just can’t let myself splurge. Reason being? It's twofold. First, I am fickle. I realize trends come and go so rather than changing costly rooms of furniture, I can be frugal just by changing out a few accessories. Second, I LOVE a good vintage "score."  Low-cost and unique.  However, a good vintage picker always knows, "Good things come to those who wait (and hunt often)."

Recently, I ordered a new sofa from my favorite local furniture store, SC Furniture. Knowing it would take awhile, I took my time to find perfect complimentary artwork. Something new would have been too easy to find, and seeing as the sofa and coffee table were fresh out of the store,  I knew I had to add some vintage art with a story to balance out my eclectic home. (Yes, there is a method to the madness of an eclectic home- haha)  

After searching artwork and paper collectables on Etsy and Ebay, I landed on 5 antique point lace patterns from an encyclopedia in 1881. I loved these victorian patterns as they look so architectural from a far, yet so pretty and delicate up close.  Besides that, they would make for a great conversation piece. I mean come on?! What better subject than, “My art work is actually a lace pattern of a toilette seat cushion?”  Who wouldn’t want to take closer look at that?  On Ebay, I paid $50 for 5 with shipping.  I then went to TJMaxx and bought 4 matching frames, each $16.99; a literal steal! 

IMG_4020.jpg

they look so architectural from a far, yet so pretty and delicate up close.

When I got home, I tried the frames with the mat board included, but the mat was a blinding white next to the vintage pages.  Obviously, that was not going to work. 

Determined to finish my project and  not willing to try and reselect frames, I opted to just change up the mat.  I considered painting them but worried the paint coverage would be inconsistent. Hmm…Perhaps covering them with paper, but then again, I would have to go to the art store. Okay, maybe just getting new mat boards cut but that would take both time and more money. Soooo…. Off to the garage, where all things are possible and free. 

There I found a couple of cuts of velvet in grays and teal (might be pretty)?  Burlap? A little dated. Multi-colored tweed? Might be too busy. Bingo!  1.5 yards of an upholstery fabric in burnt umber, a bark color I had once considered for my banquette cushions.  

Everything else, I had on hand; spray adhesive, scissors, and mounting tape. 

So the run down on cost

$50 for 5 prints (only used 4)
$70 for 4 frames
—————————
$120 and about an hour of time

Pretty good right? The frames are modern and clean, the matting looks stunning and so luxe against the old tattered pages of history. I am sure for anyone who doesn't read this post, they will look at my family room art and think I invested a lot of money in framing. If they only knew… Can it be our little secret? Shhh…

IMG_4117.jpg

It was about being resourceful, looking at things from another perspective and then giving these pages new life.

Still waiting on a new rug and in search of my next flea market score, specifically a side table. Do you have something in your house that is vintage or an antique with meaning? I know I have a strange affinity with old things; like I have a responsibility to respect them and properly display them, especially items that probably were taken for granted at some point in time.  Think about it. These very pages on lace patterns found in a Cassell’s Encyclopedia of Domestic and Social Economy were never thought of as art. Back then these pages were just a reference guide; conventional and basic. 

Simply put, it doesn't take a lot of money to make things beautiful in your home.  In this case, it was about being resourceful, looking at things from another perspective and then giving these pages new life. I gave yesteryear’s “basics” an opportunity to become something modern and quite beautiful.

So to the nameless artist behind my new prints, I realize you are no longer with us, but I am forever grateful of your craft and artistry. I hope my art tells a little of your story whoever you are.


***Link to the Ebay Shop I bought these from.  

Most Personal Valentine's Day Date Idea; Suggested Attire: Flannel

Most Personal Valentine's Day Date Idea; Suggested Attire: Flannel

The problem with being a "gifter" but in a relationship with a "non-gifter," at least for us, is this. I would put so much time and energy into giving and then so disappointed when Kevin would race out last minute asking me, "what is it you wanted again?" Yeah, he is that guy. However, he does give in other ways each day. But… one day, every year, we meet in the middle on Valentinine's Day.

Read More

Valentine's Day Mistletoe Craft With Our Friend and Master Crafter; Tatum

Yes, yes, we are aware it is way past Christmas but why should mistletoe only be made for Christmas time?  This is a month dedicated to LOVE after-all  and what better way to decorate than with sweet little bundles that hang overhead and bring you kisses??

When I thought of this little craft, I knew there was only one fellow crafter that would be up for the challenge, my friend Tatum.  I’m assuming you don’t know Tatum, we don’t exactly run in the same social circles, but it’s only because I am in my forties, and she is well, 10. Tatum is a crafter superstar though, and  I wouldn’t be surprised if she becomes your next crafter household name (move over Martha).   I had the pleasure of spending some time with Tatum last year during a camping trip. I happened to stop by the cabin they were staying at with my sister’s family only to find them all wood burning mobiles and leather dog collars led by Tatum herself.  WHAT? WHO IS THIS SMALL PERSON I AM LEARNING FROM? So, yes, Tatum has taught me a thing or two.  She crafts from the heart and has a mad passion to create beautiful things.  Simply put, I love this sweet girl andI look forward to many more crafting days with her.  

With that said, this was our first formal craft session and making these easy little mistletoe bundles was such a great way to break the ice and get to know one another.  Jonne, Tatum’s mom, was there too and we all talked about how fun this would be for anyone to do; mother’s and daughters, girl scouts, birthday parties, aunties, grandparents, friends and classrooms.  Truly this is a very simple craft for all ages, and skill levels.  Like most crafts I do tutorials on, I hope I inspire you to just get crafty.  You don’t have to have a whole closet of craft supplies, but just a few basics and this one; you can improvise on just about everything.  For instance, did you know you can dry your own flowers?  I am not kidding when I say the majority of my dried florals either started out fresh from the local market or I foraged (yes, I am that girl). Other than that, do you have scissors, glue, string and paper? That’s it! No excuses, get crafty with us! 

Be sure to scroll to the end to watch a little video of Tatum making a bundle (or… a few).  

Special thanks to Tatum and Jonne for a perfect visit and enough sweet mistletoe for every doorway!  Can’t wait for next time.  Xoxoxo

IMG_3809.jpg
IMG_3811.jpg
IMG_2440.jpg
IMG_2444.jpg

loved these colors!

IMG_3726.jpg

XOXO

Make This Inexpensive Valentine's Day Dried Floral Mistletoe Craft for Kids & Adults & Get Your Kiss

4 Steps To Getting Art Up On Your Walls; An Education on Digital Prints to Flea Market Finds, Hanging it up & Arranging

Years ago, my friend Kymberlie was determined to get these beautiful black and white photos of her kids framed and put on the wall.  Do you know this story? Her husband, Will, is an unbelievable photographer and what is more personal than framing beautiful photos taken by your very own husband!?  We designed her office around these photos.  The built-in shelves and desk were painted in a bright white and the walls; a dark grayish blue as the perfect backdrop for black and white photos.

The funny thing is though, and we often have a good laugh about it, is those frames didn't make it up on the wall…ever!  I would stop by, trade kids, STILL on the floor.  I would be over for New Year's or Halloween, STILL on the floor. Weeks… months…years later… STILL on the floor.  I am trying to remember if she ever got them up before she moved…five years later!

“...in my interior design experience, ART seems to be the NUMBER 1 struggle in terms of lost or forgotten projects...”

The truth is, life happens. Most times, those projects we were so motivated to do, slowly become less and less of a priority. Before you know it, those left-overs; those "so important" tasks seem to blend into the background of our daily life. For Kymberlie it was art work, for me, it is just about everything… a bolt of fabric in the corner of the living room, a pot on the floor waiting for the right houseplant to come along…a dresser drawer filled with everything from a secretary sold months ago. 

Ok, get on with it Sarah! Everyone experiences this with projects, but in my interior design experience, Art seems to be the #1 struggle in terms of lost or forgotten projects.  So I am going to coach you through this one and we are going to get you inspired. Let's start with determining what “excuse category” you fall into. I don’t mean to sound harsh BTW

What’s Your Excuse?

  1. You have a vision, you just can't seem to get it done

  2. You have a lot of empty walls because you are waiting for the art to “speak to you” before you buy (but…it's been 10 years and you still have nothing)

  3. Your walls are full but everything could use a refresh (ie. Your son is 40 with kids, but you only have his 3rd grade photo up)

  4. You believe, “Art is expensive, and if I can't have what I want, just leave those walls blank.”

Etsy.png

Truth be told, just like not making your bed, all four of these are just an excuse. There is a solution for each category and it starts with Step 1. After that, everyone and anyone can get to the end. Remember, the idea is not to have million dollar art, but rather, dress up your walls and finish the job- no matter your budget!

IMG_3539.jpg

Found in a small thrift store in Long Beach $5 canvas/ Frame $30 online

The plastic from the original packaging of the canvas was still stuck on the back with a $2 price tag. I don’t think this piece ever saw the light of day until I found it…kismet!

Artist: Hatim

Step 1. Make a Plan: Determine your needs, timeline and budget and Then Fully COMMIT 

No matter what your excuse is, this basic step is where you probably went wrong before. Just like anything, you have to commit to finishing! Another point, specific to planning, is determining where you need art in your home and come up with a basic plan.  For instance, if you have a gallery wall, great.  Just make sure you don't have another gallery wall in the same room.  It's all about balance, perhaps have one large statement piece on canvas, a series of 3 horizontal or vertical, all framed and matted the same and then a gallery wall. Simply put, don’t repeat the same thing or same color and texture; mixing up actually creates balance when decorating your home.

Step 2. Shop til you drop

It would be easy to say, just go to the store and pick something out. However, as we all know, art is subjective and art should be personal. As you begin your search, continue to ask yourself, "Do I want to look at this everyday." We are not talking forever, but for the next few years, will you enjoy it?

IMG_3547.jpg

Purchased from an Estate Sale, the artist worked for the film studios, and painted these all days to determine positioning and lighting before filming.

You can still see the pencil marks near the street light.

In a perfect world, all of my art would be originals collected from my travels or fellow artists, but yeah, no. I will keep that as a “big picture” goal for now. So understand not everything can be perfect, or even personal, but it can look great! While you shop, consider different sizes, textures, frames, and even materials. Art can be anything so think outside the box. Perhaps you have great grandma's beaded coin purse from the 1930's, a love letter, a vintage record cover, ticket stubs from a historical event you were at.  If you love it, you should incorporate it into the mix! 

Previously mentioned, my “big picture goal would make sure every art piece in my home tells a story. This might be why I am not big on mass produced art or prints. It may also be why I love the diamond in the rough; a good thrift, estate sale or flea market score. There is nothing more thrilling than finding a forgotten masterpiece by some unknown artist (and shame on whoever it was who put Aunt Aida’s rose painting in the Goodwill bin). I LOVE all of my painting, sketches, pottery and sculptures and I could tell you exactly what garage sale, flea market or thrift store I found it in. It’s personal, at least to me! But if you are not that person, I totally understand. It’s not for everyone.

Etsy would be my next stop.  I like Etsy as I feel like the artist is getting all of the proceeds and once again, the art is not mass produced. You can find anything there! It's a giant art faire online!  There are also online print shops who carry specific current artists' work, I love Juniper Print Shop as they size all of their prints for IKEA frames so you can take the guess work out and save a ton of money. They do other sizes and frames as well. Another idea is seeking out your local model home outlets or consignment shops if you have them. Let someone else do all the work, framing, and matting.  You can usually find really beautiful art, specifically, big statement pieces for a fraction of the price. Lastly,  and only last because I am typically on a budget, (dang kids!) but look for your local artists!  Art walks, festivals (if we ever have them again), college art shows, and other community art events make for wonderful finds.  Often times, you will be able to meet the artist, hear the story behind the piece which can make it personally priceless! 

Step 3. Printing & Framing: 

2011-08-25 14.15.57-1.jpg

A photograph taken by my cousin Drew on an IPhone 6!

Came across some of his photos on Facebook and simply asked if I could get a copy! FREE art and Super Personal! Thank you Drew Lederman!

So back to Etsy for a moment, you can find finished art, even framed art or stretched art but if you really want creative freedom in terms of size (or color- you didn't hear me say that), you have to go with digital downloads.  It might seem a little scary if you have never printed these but rest assure, you can do it! The wonderful thing about buying digital art these days is that the options are endless in terms of size and finding subject matter that "speaks to you." Once you purchase your printable download, an email is usually sent with a downloadable link, typically each download is a different size. If possible, download only the size you think you need.  Those files, because they are in a high resolution, can take up a lot of storage on your computer. 

Once you have it, you simply need to send it to a print shop. If possible, take it to a local printer.  I am sure they could really use our support right now. However, there are a ton of options online for printing and they will send them right to you. I was a little overwhelmed on how to print or deciding on what paper to print.  I don't know anything about printing professionally!  However, after purchasing a download on this Etsy shop, Heirloom Print Shop they sent me this amazing guide I have deemed priceless information.  It is a 7 page guide on paper types, costs, printing tips and even resources on where to have things printed for every budget.  Take a look and then shop their store on Etsy for traditional art. I love it all and bought 3 painting for $15! 

For more online digital art resources and tips, I love what The Gold Hive wrote in this blog post.  Check it out! 

Step 4. Get it up! 

Wrapping up, let's chat about hanging up your new art. For the sake of time, I am not going to address the “how to” hang or arrange your art but rather, give you my best quick tips for hanging art in your home. These tips are are tried and true! I promise too, I will circle back to how to hang and arrange another day.

Tips & Tricks

IMG_1739.jpg
  • Assuming your wall is super wide or high, do not feel like you have to fill space simply to fill space. Group your art, or hang things in a vertical or horizontal row; keeping things tight so it looks like a collection instead of you trying to fill in a 12 foot wall with 3 small pictures. For good measure keep art 1” to 6” apart at most on one wall in one room.

  • Art should be hung at eye level (unless you are under 5ft or over 7ft). If you are hanging art in areas where you sit most of time, lower your art slightly lower than eye level. You don't want people looking too far up when they are sitting down.

  • When hanging art above a table or sofa, the bottom of the frame should be approx. 4-8" above.

  • Do not hang giant art over small things. You want the grounded furniture to anchor- so if you put a large art piece above a tiny thing, it WAY out of proportion. The opposite applies as well.

  • Don't feel like all of your frames have to match or be one color. Mix the metals with painted and the wood.

Art seems to be the number one design project that never gets done. Here are my 4 easy steps to making sure you home looks beautiful and complete. Using per...

As always, I could just keep rambling/ writing! Is it a Covid thing? Perhaps I have been in my bubble too long because writing these posts out to a universe, who may or may not be listening is getting way too easy! LOL. Regardless of my total tangent, I hope you found some helpful information here. I am always up for questions or advice, so by all means… Send them my way!